


Select the optimum Fisherbrand
filter whatever your application
Maximise your time and budget while
getting the supplies you need.
Focus on Fisherbrand with a selection of useful product resources including instruction manuals, FAQ’s, troubleshooting guides, selection guides, compatibility charts and workflows. Together Fisherbrand, Fisher Chemical and Fisher BioReagents offer reliable and essential laboratory products, helping you to produce your best work each and every day.
A. The type of buffer used to run DNA in agarose gel electrophoresis depends primarily on the size of DNA fragment and the postelectrophoresis application. Two buffers commonly used for DNA agarose electrophoresis are Tris-Acetate with EDTA (TAE; 40mM Tris-Acetate, 1mM EDTA) and Tris-Borate with EDTA (TBE, 89mM Tris-Borate, 2mM EDTA). Because the pH of these buffers is neutral, the phosphate backbone of DNA has a net negative charge and migrates toward the anode.
TAE and TBE have different properties which makes one more suitable than the other for specific purposes. For larger DNA fragments (>10kb) TAE is preferred. For smaller DNA fragments (<1kb) TBE is generally preferred as it has a greater buffering capacity and will give sharper resolution than TAE. TAE is also the preferred choice of buffer when the DNA sample is to be used in cloning experiments as the borate in the TBE buffer is a strong inhibitor for many enzymes.
A. The recommended thickness for agarose gel is 3 to 4 mm. Gels thicker than 5mm will result in fuzzy bands.
A. Fisher Bioreagents Cat. No 10766834 agarose, molecular biology grade, is well suited for routine separation of DNA and RNA in the range 500bp to 23kb. For separation of fragments in the 100 to 2,000bp range, we would suggest Fisher Bioreagents Cat. No 10766834, increasing the gel concentration (>2%) and using TBE buffer (not TAE).
A. The comet assay (single cell gel electrophoresis) is a simple method used for measuring DNA strand breaks in eukaryotic cells. A low melting point agarose is usually required. We would suggest Fisher Bioreagents Cat. No 10377033 as this is a low melting, molecular biology grade agarose which is ideal for separating and recovering nucleic acids.
A. You should load no more than 100ng of DNA. This amount should give you a clear well-defined band when stained with ethidium bromide and viewed under a UV light. If you load too much DNA then you will see a smear.
A. The loading dyes in Fisher Bioreagents Cat. No 10205023, agarose gel-loading dye, 6X are a unique blend of three tracking dyes that make estimating sample migration simple and reliable:
A. The recommended voltage is 4 to 10 volts/cm (cm is determined by measuring the interelectrode distance, i.e the distance between anode and cathode, not the length of the gel) under normal electrophoretic conditions. If the voltage is too low, the mobility of small DNA (<1,000bp) is reduced and band broadening will occur due to diffusion. If the voltage is too high, the band resolution is reduced, mainly because of gel overheating.
A. Recirculation prevents the formation of pH gradient and buffer depletion, so it is advisable to recirculate the buffer especially during extended electrophoresis. Buffer recirculation is also important when running larger TAE gels due to the lower buffering capacity of TAE.
A. Ethidium bromide destaining bags are available, Fisher Bioreagents Cat. No 12861680. These bags will remove up to 5mg ethidium bromide when stirred with solution overnight. However, as disposal regulations vary, please contact your local safety officer for disposal guidelines.
A. We do not have information regarding the amount of DNA in each discrete fragment (band) of Fisher Bioreagent Cat. No 10284633, low scale (100bp) DNA ladder. This DNA ladder is meant to be a general purpose sizing standard for DNA fragments such as PCR* amplicons separated on agarose mini gel. It is not meant to be used as a quantitative standard. However, for quantitation, we have the exACTGene DNA ladders such as Fisher Bioreagents Cat. No 10021463; this low range plus DNA ladder provides the approximate amount of DNA in each band.
A. Care should be taken when selecting the percentage acrylamide or pore size of the gel to be used. The table below details which percentage of gel to use to separate the sizes of proteins indicated.
| Acrylamide Percentage | Separating Resolution |
| 5% | 60 to 220kDa |
| 7.5% | 30 to 120kDa |
| 10% | 20 to 75kDa |
| 12% | 17 to 65kDaa |
| 15% | 15 to 45kDa |
| 17.5% | 12 to 30kDa |
A. For protein gel electrophoresis, typical sample loading buffers are available in either a reducing or non-reducing formulation. Dithiothreitol (DTT) is a common reducing agent used in protein sample buffers. The formulation of Fisher Bioreagents Cat. No 10376363, protein gel loading dye (2X), does not contain a reducing agent such as DTT.
A. It is not advisable to autoclave Fisher Bioreagent Cat. No 10204733, 10X PBS, as phosphate may precipitate out. For this product, we filter the buffer solution through a 0.2micron filter into a sterile 1L poly bottle under a sterile hood.
A. The formulation of Fisher Bioreagents Cat. No 10649743 Phosphate Buffered Saline (PBS), 10X solution is as follows:
A. Western blotting is based on the separation of proteins by their size on a gel. However, migration of proteins through the gel matrix is also affected by other factors, which may cause the observed band size to be different from the predicted size. Common causes are:
A. Coomassie staining is probably one of the most well known protein staining techniques. Two main Coomassie staining methods exist, “classical” Coomassie and the more recently developed colloidal Coomassie.
A. Yes, it is possible to stain with either Coomassie or Colloidal Blue stain prior to Western blotting, though decreased transfer and subsequent probing efficiency may occur. However, it is important to note that this is generally only recommended to try if you use colloidal stain. To ensure optimal transfer efficiency, destain the gel and then equilibrate in a series of Tris base/glycine/SDS solutions to increase solubility. When the transfer is complete, the membrane should be treated with methanol to remove the stain prior to chromogenic development (not necessary prior to chemilumninescent detection).
A. Here are some options for obtaining more efficient transfer for larger proteins:
A. There are two factors to consider - poor transfer and the ladder passing through the membrane during the transfer. For poor transfer onto membrane, consider the following:
A. The most commonly used buffer is RIPA buffer with SDS. The usual formulation is as follows: 150mM NaCl, 10mM Tris, pH 7.2, 0.1% SDS, 1.0% Triton X-100, 1% Deoxycholate, 5mM EDTA Protease inhibitors: 1mM phenylmethylsulfonyl fluoride, 10mM benzamidine, 2μg/mL leupeptin Phosphatase inhibitors: 100μM sodium orthovanadate, 10mM p-nitrophenylphosphate
A. Optimise the concentration of primary and secondary antibodies. In some cases, increasing the concentration of blocking agent (BSA or non-fat dry milk) reduces background signal. After incubation with the primary antibody, wash at least two times with TBST (include 0.5M NaCl in one or more of the wash steps). Avoid Nonidet™ P40 or Triton™ X-100 in buffers as these detergents decrease because protein detection.
A. Yes, Cat. No 12737119 (Bovine Serum Albumin, fraction V heat shock treated), can be used in a number of molecular biology applications including Western blots (as a blocking agent) and ELISA and as a stabiliser for enzymatic reactions. Another newer BSA product that you may consider is Cat. No 12871630 (BSA, Heat Shock Treated and Protease Free). This product has found great use in RIA and ELISA and as a blocking agent.
A. For storage, following transfer, air dry the blot and place it between two clean sheets of filter paper. Place the blot-filter paper sandwich between two sheets of card, in order to keep it flat, and place it in a sealable plastic bag. The blot can be stored at 4°C for up to two weeks, -20°C for up to two months or indefinitely at -80°C. When ready to reprobe, pre-wet the blot with alcohol for a few seconds, followed by a few rinses with pure water to reduce the alcohol concentration.
A. Power (W) = Voltage (V) x Current (A)
Resistance (Ω) = Voltage (V) / Current (A)
A. The resistance of an electrophoresis unit depends on its size, gel thickness, amount of buffer, buffer conductivity and temperature. This resistance will normally decrease in time due to a slowly increasing temperature. Electrophoresis units which have a resistance below the minimum load resistance of a power supply will trigger an alarm! Read the output voltage and current during a run to measure the resistance and use above formula to calculate the value.
A. Either your programmed parameters are not equal to those described or the resistance of your electrophoresis unit is different (see above). It cannot be due to e.g. an other model of power supply as the relations between Voltage, Current, Power and Resistance are monitored in the same way by any instrument.
A. If outlets are in parallel each electrophoresis unit will be supplied with exactly the same voltage. However, current and power may differ due to differences between them even when exactly the same model, gel, buffers, etc. are used. Therefore, it is recommended to run several electrophoresis units only in the constant voltage mode on the same power supply.
A. Electrophoresis at high voltages produces heat. Additionally, high conductivity buffers such as TAE generate more heat than low conductivity buffers. Care should be taken in agarose gel electrophoresis with voltages greater than 175V, as heat build up can generate gel artifacts such as S-shaped migration fronts, and in extended electrophoresis runs, can even melt the agarose gel. With high voltage electrophoresis, the use of low melting point agarose gels should be avoided.
A. A number of electrodes could be suitable, but what’s important is that it is a “double junction” electrode. Refer to the ‘pH Electrode Selection Guide’ on page 26 or further advice.
A. Not all electrodes are suitable for all sample types. Refer to the ‘pH Electrode Selection Guide’ page 26 or for further advice contact the Fisher Scientific Product Support Team.
A. Standard electrodes use silver ions in their reference system. Proteins, Tris buffers and general biological samples all react with silver ions and this reaction can lead to the electrode having a shorter life span.
A. Fresh buffer solutions (preferably certified to a known standard) should always be used. The age of an electrode should also be considered. Electrodes have a useful lifetime of approximately 6 months to a year, and should be treated as a consumable.
A. To ensure accurate and reliable readings, we always recommend calibrating in three pH buffers, normally pH 4, 7 and 10. However, depending on the accuracy you actually require, this can be done at as few as two pH points (e.g. 4 and 7 or 7 and 10) or as many as five points on the Fisherbrand accumet meters. Important points to remember when choosing pH buffers are to make sure that they encompass the typical pH range that you expect your samples to fall within, and to never calibrate at points more than 3 pH units apart (calibrating at 4 and 10 for example will not give good results). Always calibrate at pH7 regardless.
A. The meter should be calibrated regularly using fresh buffers. If used on a daily/weekly basis, then this should be before each use. If the meter is in constant use throughout each day, then it may better calibrating midway through each day as part of a calibration routine.
A: The pH value of any sample varies with temperature, so for accurate readings it is always best to measure the temperature too. If you are measuring at a different temperature to which you calibrate at it may be worth considering an “ATC” (automatic temperature compensation) probe, or an electrode with one built in to measure this. Modern pH meters will adjust the slope value of the electrode as the temperature changes, ensuring the readings stay accurate.
A. This is generally not a problem. The vast majority of manufacturers nowadays use a “BNC” connection between the electrode and the meter for standard pH electrodes. This can however cause an issue when using an ATC probe, as these connectors are not standardised and are manufacturer specific.
A. As regularly as possible. Cleaning and maintaining it will help prolong the electrode’s life. It is worth noting that you must be careful not to leave an electrode soaking in aggressive cleaning solutions once clean. This could end up damaging the electrode. Key points to remember:
A. This is possible. What’s important is the conductivity cell constant (also known as the “K” value). A cell constant of 0.1 would be needed for pure water samples. Each cell constant has a limited sensing range so please make sure you choose one whose range encompasses that of your expected sample conductivity. See below for examples of sample types, approximate conductivity values, and suitable cell constants:
A. There is currently no standard connection for meters and conductivity cells yet and all manufacturers use a different system. It is therefore recommended that you stick to conductivity cells from the same manufacturer as your meter.
A. Temperature can have a substantial effect on conductivity. Raising the temperature obviously affects the chemical properties of aqueous solutions. This in turn contributes to the solution’s conductivity. Typically, conductivity varies by 1 to 3% per degree °C
A. Conductivity cells require minimal storage compared to other electrode types. They can be stored in deionised water in between measurements. For overnight storage, they can be simply rinsed in deionised water and then stored dry.
A. This should be done on a regular basis, before each use if possible (possibly as part of a daily calibration routine).
A. In the context of measurement science, traceability that the result of a measurement can be traced back to a national authority such as the National Institute of Standards and Technology (NIST), a United States Government Agency within the Commerce Department. Specifically there exist a known valid relationship to international or nationally recognised standards and a thoroughly documented unbroken chain of reference to the measurement authority. The ISO 17025 calibration certificate that comes as standard with the units is recognised in all European countries.
A. Each Traceable™ unit is individually serialised, calibrated and certified. An individually serialised Traceable™ Calibration Certificate provides assurance that an independent auditor has checked the methods, procedures, testing, technique, and record-keeping practices of the calibration testing laboratory. The American Association for Laboratory Accreditation (A2LA) is widely recognised internationally through bilateral and multilateral agreements and through its participation in International Laboratory Accreditation (ILAC) and Multilateral Recognition Agreement (MRA). There is no need to have the units calibrated locally before use as all European governing bodies fully accept and recognise the Traceable™ certificate of calibration.
A. Units are calibrated for two years from date of manufacture. Generally, following shipping and stocking of the units, we would advise that you should expect a minimum of one year.
A. Accuracy is a definition of how accurate the instrument is compared with a known temperature. Since it is very unlikely that anything will be exactly accurate, it is usually accompanied by a reference to a tolerance. The tolerance indicates the value of inaccuracy that is inherent in the instrument. For example, an instrument that has an accuracy rating of ±1°C means that the unit’s display can show up to 1°C higher or 1°C lower than the actual temperature that is being measured and still be within the stated tolerance and accuracy of the unit.
A. The resolution of an instrument is the smallest value that is shown on the display. Thus an instrument that has a 0.1°C resolution means that it will read to the nearest 0.1°C (perhaps 8.6°C) on the display, whereas an instrument with a 1°C resolution will only read to the nearest 1°C (9°C).
A. None of the Fisherbrand Traceable™ products need to be recalibrated or recertified due to a battery change. These units are traceable back to NIST standards and the ISO 17025 calibration certificate that comes as standard with the units is recognised in all European countries
A. Yes replacement scoops are available, Fisher Scientific Cat. No. 15388764. This is the standard replacement scoop, 30mL. There is also a larger replacement scoop available which is 40mL, Fisher Scientific Cat. No 15398764.
A. Min/Max are the temperature readings at the lowest range (minimum) achieved and the highest range (maximum) reached since the thermometer’s memory was last cleared; the Min/Max is NOT a settable feature. On several units, you can program HI and LO alarms so that if the temperature of what you are measuring goes outside of your pre-set values, the unit will alarm. Several thermometers also feature IN/OUT readings. The IN and OUT temperatures refer to different sensors, the IN is the internal sensor located inside the unit and the external probe is referred to as OUT
A. Bottle probes are useful for use in refrigerators where the door is likely to be opened on a regular basis. The probe sealed within the bottle gives an indication of the temperature of the product within the refrigerator itself rather than the air temperature, which would be affected quite quickly by the door being opened. The vaccine probe uses a similar concept, but is of similar dimensions to most vaccine bottles. This helps to give an accurate determination of the temperature of the vaccine being stored.
A. Bottle probes are filled with non-toxic glycol solution, which is GRAS (generally recognised as safe) by the US FDA.
A. The various ‘Ultra’ products in the Traceable™ range are calibrated with an accuracy of 0.4°C at tested calibration points. ‘Extreme accuracy’ units are also available. These are calibrated with an accuracy of ±0.05 within 2°C of tested points. These are available for the commonly tested points of 0°C, 25°C and 37°C. Additionally, the Platinum High-Accuracy thermometers have an accuracy of ±0.1°C across the entire temperature range.
A. Erratic readings, a faint display, or no display are all indicators that the batteries must be replaced. In most cases, simply changing the battery will allow the unit to begin functioning normally.
A. When comparing two thermometers, you must add the tolerances of the two units together to identify the total amount of variance that can be found within the two units and still be considered within specification. For example, when comparing two of the same unit that have a ±0.1°C accuracy, the two units can display temperatures that are up to 2°C different. When comparing temperatures of difference thermometers it is important that the type of probes that you are comparing are equivalent.
A. Almost all Fisherbrand vials are made out of 1st hydrolytic class glass. Hydrolytic class glass is very hard and has a low expansionm coefficient even at high temperature variations. It shows an excellent chemical resistance to acidic and neutral solutions, and even to alkaline solutions due to its relatively low alkali content.
A. All Fisherbrand vials that carry a CleanPack label on the front side of the polypropylene box have been packed in a certified cleanroom after having passed the annealing oven at approx. 600°C. The CleanPack label on the box is a guarantee of clean, uncontaminated vials for a correct analysis. Additionally, tamper-proof evidence is given by the shrink-wrapping of the bottom part of the polypropylene box, plus its cover enables recloseability at any time during consumption in order to avoid any later contamination of the vials during usage.
A. Silanised vials are used to reduce the adsorption of polar compounds onto the normally polar surface of the glass container. Some compounds like amino-acids, proteins or phenols tend to react with the OH-groups of the glass, even if – as is common for chromatography – 1st hydrolytic class glass is used. Through the silanisation process the glass surface is deactivated and so possible reactions between the polar compounds and the glass are eliminated.
A. The right choice of septa depends on the application. Almost all septa are laminated on one side with PTFE, which has a high chemical resistance and forms an inert barrier between sample and carrier material of the septa. The carrier materials have different physical and chemical properties, such as temperature resistance, resealability properties, cleanliness, hardness, thickness, etc. To help you identify the most appropriate septa for your temperature range and application, please refer to the guide on page 13 of this brochure.
A. Please refer to table 4: Chemical compatibility of vial and closure materials on page 16 to 17 of this brochure. This table is for reference purposes only. Many factors affect the chemical resistance of vials and closures and we would kindly remind you that it is your responsibility to do a test under your own conditions to ensure that the product you are using is fully compatible.
A. The hardness testing of plastics is most commonly measured by the Shore (Durometer) test. This method measures the resistance of plastics toward indentation and provides an empirical hardness value. Shore hardness is measured using either the Shore ‘A’ or ‘D’ scales. It is the preferred method for rubbers/elastomers and is also commonly used for ‘softer’ plastics such as polyolefins, fluoropolymers and vinyl. The Shore A scale is used for ‘softer’ rubbers while the ‘D’ scale is used for ‘harder’ ones. Most septa hardness values are covered by Shore A, although exceptions are some PTFE and PE hardnesses measured using Shore D. The results obtained from this test are a useful measure of relative resistance to piercing of various grades of polymers. This gives guidance on the type of needle that will penetrate the seal and whether thinner gauge needles may be used.
A. Certifications become more and more important in order to make processes more reproducible and avoid possible sources of errors right from the beginning. Highest quality, consistency and quality control have always been very important and are highlighted in three certifications, ‘Specification Certified’, ‘HPLC and GC Certified Kits’ and ‘LC/MS and GC/MS Certified Kits’. For further information please refer to page 15 of this brochure.
A. At the moment the market offers, in general, three different closures systems for sealing an autosampler vial:
From the evaporation rate point of view, a crimp cap provides the tightest seal, followed by the screw cap and then the snap caps. However, from the handling point of view, screw and snap caps are more convenient, as no crimper and de-crimper has to be used. If convenience of handling is desired, together with high sample integrity and reproducibility of a crimped vial, then the screw thread vial with a stop ring is the best alternative. This screw thread vial not only offers the lowest evaporation rate, it also removes cap tilt and guarantees less autosampler interruptions due to mishandled vials.
Magnetic vial transport systems of state of the art autosampler require magnetisable closures. This type is available for crimp and screw thread closures.
A. Re-use or washing of vials is definitely a risk for your sample integrity, as the surface of the vial changes during the cleaning process (grade of adsorption of critical compounds increases) and the complete removal of the former analytes cannot be guaranteed 100%, so cross-contamination and/or ghost peaks can be the consequence. Chromatographers requiring uncompromising sample integrity would be best advised to always use new vials and septa for each analysis.
A. Borosilicate glass reduces the potential for metal adduct contamination, ensuring reliable chromatograms even after the product has been in use for a period of time.
A. Optima™ LC-MS products (solvents, blends, additives and reagents) have been specifically developed to allow the most sensitive of instruments to operate to the peak of their performance. Smooth baselines and background are assured through an LC gradient test with PDA detector. Testing also ensures neither positive nor negative ion impurities are present. As presence of metal anions and analytes complicate the spectra, our manufacturing process has been developed to ensure that impurities are minimal. For more routine analytical applications a ‘standard’ LC-MS grade product is offered.
A. Diverse chromatographer requirements have led us to look for ways to improve our purification processes and to develop a series of solvents and buffers that meet the needs of specific instrumentation. Fisher Chemical solvent grades are developed and tested to optimize chromatography performance through choice of grade to suit both instrument and detector type.
| Chromatography Application | Instrument and Detector Type | Fisher Chemical Solvent Grade |
| UHPLC-MS | UHPLC coupled with Mass detector | Optima UHPLC-MS |
| High HPLC-MS | LC and UHPLC coupled with Mass detector | Optima LC/MS |
| HPLC-MS | LC coupled with Mass detector | LC-MS Grade |
| UHPLC | UHPLC coupled with UV detector | UHPLC Gradient Grade |
| High HPLC Gradient Analysis | LC gradient coupled with UV detector | HPLC Advanced grade |
| HPLC Gradient Analysis | LC gradient coupled with UV detector | HPLC Gradient Grade |
| HPLC (isocratic) | LC coupled with UV detector | HPLC Grade |
Additionally, to support other specialty chromatography techniques, we also offer a range of specialty solvents, all specified and tested as appropriate: all specified and tested for HPLC:
A. Fisher Scientific Cat. No. 10596814 is packed in HDPE bottles for purposes of safety. Use of an HDPE bottle avoids the dangers of pressure build-up from carbon monoxide which is a natural decomposition product of formic acid. Customers should not be concerned about possible contamination by plasticisers because a proprietary surface treatment is applied to the HDPE bottle to create a barrier between the bottle surfaces and formic acid thus preventing contamination. It is good laboratory practice to store this product at 4°C to slow down this natural decomposition process.
Optima™ LC-MS grade formic acid is also available packaged in 0.5mL, 1mL and 2mL glass (borosilicate) ampoules, Fisher Scientific Cat. Nos. 10780320, 10473038 and 10063427 respectively. Note – the ampoules are pre-scored for easy opening.
A. No, temporary storage under ambient conditions will not impact the reagent. However, for long term storage, we again recommend that the product is held in cool conditions at 4°C in order to maintain product integrity longer.
A. The main distinction of borosilicate glass from soda lime glass is the substitution of boric oxide for soda and lime in the manufacturing process. It has a higher heat resistance and does not expand like soda lime glass, meaning that it is able to handle both extreme heat and cold, making borosilicate glass very popular for laboratory glassware.
A. Glassware is generally considered safe for autoclaving. When autoclaving glass containers ensure that caps are loosened. Autoclaving with tightly screwed caps can result in pressure differences and consequent breakage. Do not autoclave glassware that is etched, cracked, nicked or scratched. Such defects reduce the thermal strength, making the glassware more prone to breakage.
A. Whilst Erlenmeyer flasks and beakers are marked with approximate volume indication, there is still is a +/- 5% uncertainty about where their volume line actually belongs. There are only five volumetric measuring devices recognised as suitable for precise and accurate analytical work. These are volumetric flasks, measuring cylinders, burettes and volumetric pipettes and are classified into the two different grades, Class A and Class B.
A. Laboratory volumetric glassware such as volumetric flasks, measuring cylinders, burettes and volumetric pipettes are produced and calibrated in accordance with American Society for Testing and Materials (ASTM) standards (ASTM predates other standard organisations such as BSI and DIN). They are available as two different grades, Class A or Class B. The ASTM standards define the tolerances within which the markings are placed on the glass. Class A is the most accurate as it has the smallest tolerances, with Class B in general, twice the acceptance range of Class A.
A. Fisherbrand glass volumetric pipettes are Class AS, which has recently replaced Class A. Class AS is the European standard and shares the same high accuracies and tolerances to the relevant ISO and DIN standards as Class A. Class AS serological pipettes also have a faster dispensing speed than Class A pipettes (the S stands for the German word ‘schnell’ which translates as ‘swift’). As a consequence of the increased dispensing speed a five second waiting time must be observed when filling or dispensing the required volume. This ensures that the meniscus has settled and maintains accuracy.
A. Ultrasonic cleaning is a good method of cleaning glassware thoroughly. Ultrasonic cleaners that use heaters are the best. Generally, using an ultrasonic cleaner with a mild detergent will clean most residues from glassware. When using equipment to clean glassware ensure that the glassware is secure and take extra care when loading and unloading as this is a common cause of chips and breakages.
A. Amber glass is used in laboratories for the protection of UV sensitive chemicals and materials. Amber glass blocks all UV radiation from 350 to 200nm. The UVC range used for micro-organism killing purposes, between 200 to 280nm is also blocked. However, not all UV radiation is blocked by the amber glass.
A. Glass containers do not have an expiration date or a limit to their shelf-life. However, it is important to regularly check your glassware for signs of damage which could lead to a compromise in safety or accuracy. If there are significant signs of damage it should be disposed of and replaced.
A. Generally, glassware can withstand temperatures up to 500°C. However, once the temperature exceeds 150°C extra special care should be taken to ensure that heating and cooling is achieved in a slow and uniform manner. If you are using a hotplate, ensure that the top plate is larger than the base of the vessel to be heated. Also, never put cold glassware onto a hotplate which is already well heated. Warm up gradually from ambient temperature. If using a bunsen burner, adjust it to get large soft flame, this will heat the glass slowly and more uniformly. In addition, use a wire gauze with a ceramic centre to diffuse the flame.
A. There are no defined guidelines on when to have your glassware re-calibrated as it depends on how it is cleaned, handled and stored. Normally, volumetric glassware only needs re-calibrating after extensive or demanding usage, as this may have affected its original accuracy. For example recalibration should be considered if:
A. The best insurance for accurate volumes is to insure that your glassware is clean. For burettes and pipettes, cleanliness of the glassware is indicated by the absence of any ‘water beads’ on the inside surface of the glassware. When the item is clean, the solution will exist in a thin, unbroken film on the inside of the glassware. Typically, a brief soaking in a warm detergent solution will be enough to clean pipettes and volumetric glassware. You should avoid soaking the glassware for too long, because if it is left for too long with the detergent solution a rough area is likely to develop at the glass/air interface, which may destroy the usefulness of the equipment. After a brief (2 to 3 mins) soaking, the glassware should be rinsed thoroughly with tap water, and finally 3 to 4 rinses with distilled or deionized water. Don’t dry the glass surface with towels, just leave it protected from the dust. It is not necessary to dry the glass in the lab dryer, but if you have one - use it. Not only will it dry the glass faster, but it will also keep the glass protected from the dust during drying.
A. Fisherbrand bottles are not pressure rated and great care should be taken when using glassware for pressure applications. Fisher Scientific cannot guarantee any glassware against breakage when used under vacuum or pressure.
A. Only polypropylene, PTFE, PC and PMP (TPX) products can be autoclaved (autoclave cycle is defined as 121°C at 15psi (1bar) for 20 minutes). When autoclaving bottles always ensure the caps are loosened. Autoclaving with tightly screwed caps can result in collapse or deformation. Also do not subject plastic volumetric ware such as measuring cylinders, flasks etc to temperatures above 60°C as high temperatures can affect volumetric accuracy
A. Both LDPE and HDPE has a brittleness temperature of -100°C and so can be used when freezing samples too large for standard cryovials. Care should be takes to ensure that there is enough space left in the container for the sample to expand. Suggestions include Fisher Scientific Cat. No 11735383, 11775243 and 11957934.
A. For applications where optical clarity is important, polymers such as polystyrene, PET, PMP or polycarbonate would be favourable. Other polymers such as polypropylene and polyethylene are translucent and in some cases opaque and are therefore not ideal for this requirement.
A. For specific chemical compatibility with particular polymers, please refer to the ‘Chemical Compatibility Chart’ chart on pages 14 and 15.
A. A low or non-alkaline detergent is suitable for cleaning most plasticware, such as Fisher Scientific Cat. No 12701875. Note however that polystyrene and polycarbonate products are susceptible to attack by alkalis and a neutral detergent is recommended such as Fisher Scientific Cat. No 11502773. It is also important to avoid using abrasive cleaners or scouring pads which can result in surfaces becoming scratched and weakened.
A. The right choice of bottle or vial septa depends on the application. Almost all septa are laminated on one side with PTFE, which has a high chemical resistance and forms an inert barrier between sample and underlying carrier material. The carrier materials have different physical and chemical properties, such as temperature resistance, resealability properties, cleanliness, hardness, thickness, etc. The guide overleaf will help you to identify the best septa for your particular application.
Septa
Specific conditions involved in your particular application help dictate the selection of the best septa materials as exemplified below
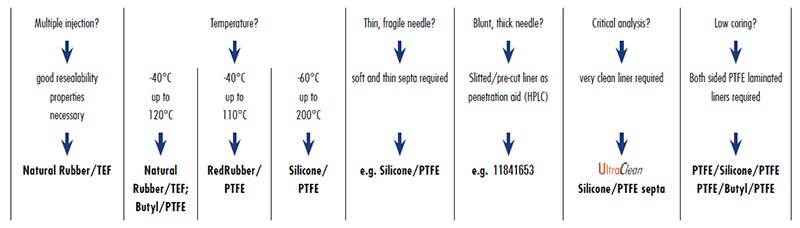
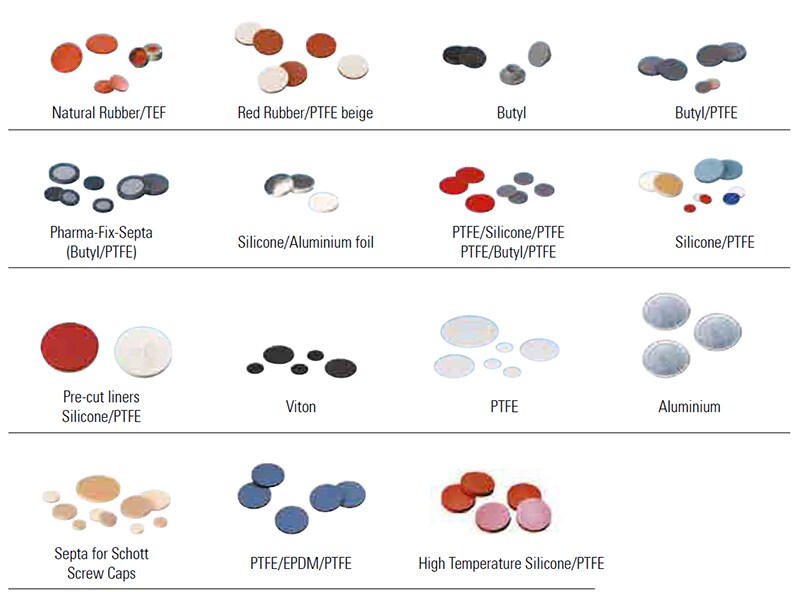
In order to help you visualise the most common septum material combinations on the market, please see the images below. Please note, however, that their colours do not necessarily provide an indication of the actual liner material itself.
| Problem | Suggestions |
| No bubbles appear at the electrodes when operating voltage is applied |
|
| Melted agarose leaks when casting |
|
| Sample well deformed |
|
| Samples leak underneath the gel upon loading |
|
| Samples do not run straight |
|
| ‘Smiling’ along one edge of the gel |
|
| Bromophenol Blue dye turns yellow |
|
| Double-banded pattern |
|
| ‘Tailed’ bands (excessive fluorescence appearing above the band) |
|
| Poor band resolution |
|
| Gel melts or softens near sample wells |
|
| Problem | Cause | Suggestions |
| Poor protein transfer | Transfer apparatus assembled incorrectly and proteins moving in the wrong direction |
|
| Western detection system not working or not sensitive enough |
|
|
| Transfer time too short |
|
|
| Power setting too low |
|
|
| Charge-to-mass ratio incorrect for native transfers |
|
|
| Defective or inappropriate power supply used |
|
|
| Excessive methanol restricting transfer |
|
|
| Protein precipitating in gel | Protein precipitating in gel |
|
| Swirls or missing bands; diffuse transfers | Poor gel-membrane contact. Air bubbles or excess buffer remain between membrane and gel |
|
| Membrane not fully wet or has dried out |
|
|
| Problem with gel electrophoresis |
|
|
| Gel cassette pattern transferred to blot | Contaminated fibre pads |
|
| Poor binding to membrane - nitrocellulose | Excessive methanol restricting transfer |
|
| Proteins may be transferring through nitrocellulose |
|
|
| Proteins <15kDa have reduced binding to 0.45µm nitrocellulose or may be washed from membrane during assays |
|
|
| SDS in transfer buffer reducing binding efficiency |
|
|
| Membrane is not completely wet |
|
|
| Poor binding to membrane - PVDF | Membrane is not completely wet |
|
| Proteins might be transferring through the membrane |
|
|
| Membrane might have dried during handling |
|
|
| SDS in transfer buffer reducing binding efficiency |
|
|
| Power | Power is too high |
|
| Immune-specific detection | Overall high background |
|
| Total protein detection | Total protein detection |
|
| Problem | Cause | Suggestions |
| No Display / lights | No a.c. power |
|
| a.c. power cord is not connected |
|
|
| The fuse has blown |
|
|
| Fuse repeatedly broken | Hardware failure |
|
| Operation stops | Electrophoresis cables are not connected to the power supply or to the electrophoresis unit(s). There is a broken circuit in the electrophoresis tank |
|
| High resistance due to tape left on a pre-cast gel; an incorrect buffer concentration or volume in the electrophoresis tank |
|
|
| Er1 Error message | Current exceeds the maximum output for the power supply (>400mA) |
|
| Er2 Error message | Voltage exceeds the maximum output for the power supply (>300V) |
|
| Er3 Error message | Thermal limitation of the power supply reached (Output voltage <10V) |
|
| nld Message | No load is detected |
|
| AL1 Alarm message | Power exceeds the maximum output (60W) |
|
| Problem | Cause | Suggestions |
| Meter will not calibrate | Meter |
|
| Buffers |
|
|
| Electrode |
|
|
| Technique |
|
|
| Meter is giving erratic readings or readings are not stable | Electrode |
|
| Technique |
|
|
| Electrodes are typically lasting <6 months when being used with Tris buffers/protein samples | Electrode |
|
| New electrode has arrived with white crystalline build up | Electrode |
|
| Electrode bulb/body is cracked and leaking | Electrode |
|
| Instrument reads inaccurate temperature | ATC Probe |
|
| Other potential problems | Temperature |
|
| Operator technique |
|
|
| Sample type |
|
| Problem | Cause | Suggestions |
| Conductivity | Meter |
|
| Conductivity cell |
|
|
| Technique |
|
| Problem | Cause | Suggestions |
| ISE Display reads “- - -“ | Two point calibration has not been performed. |
|
| Conductivity - Can’t adjust or can’t calibrate | Conductivity calibration standards/ Settings |
|
| Conductivity - second calibration point replaces the first | Settings |
|
| TDS - Standard does not match | Settings |
|
| OR” or “UR” error message | Meter |
|
| Forgotten password | Meter |
|
| Cat No. | Channels | Traceable™ Certificate supplied |
Accuracy | Maximum time |
Resolution | Battery | Clock | Memory | Features |
| 11745863 | 4 | Yes | 0.01% | 100 hours | 1 second | 15338754 | Yes | Yes | Four-channel countdown/up |
| 11784426 | 4 | Yes | 0.01% | 100 hours | 1 second | 15338754 | Yes | Yes | Personalise your timer |
| 11725863 | 3 | Yes | 0.01% | 100 hours | 1 second | 15348754 | Yes | Yes | Continuous alarm |
| 11705873 | 3 | Yes | 0.01% | 20 hours | 1 second | 15348754 | Yes | Yes | Triple display |
| 11597453 | 3 | Yes | 0.01% | 100 hours | 1 second | 15338754 | Yes | Yes | Triple display |
| 11749795 | 2 | Yes | 0.01% | 100 hours | 1 second | 15348754 | No | Yes | Visual and audible alarms |
| 11745759 | 2 | Yes | 0.01% | 24 hours | 1 second | 15348754 | Yes | Yes | Adjustable display |
| 11755863 | 2 | Yes | 0.01% | 24 hours | 1 second | 15338754 | Yes | Yes | Two-channel countdown/up |
| 12695296 | 2 | Yes | 0.01% | 24 hours | 1 second | 15338754 | Yes | Yes | Ultra-compact |
| 11507493 | 2 | Yes | 0.01% | 20 hours | 1 second | 15338754 | Yes | Yes | Two-line display |
| 11739795 | 1 | Yes | 0.01% | 100 minutes | 1 second | 15348754 | No | Yes | Visual and audible alarms |
| 15204016 | 1 | Yes | 0.01% | 100 minutes | 1 second | 15348754 | No | Yes | Extra-large digits |
| 11765863 | 1 | Yes | 0.01% | 100 minutes | 1 second | 15348754 | No | Yes | Jumbo digits |
| 11795863 | 1 | Yes | 0.01% | 100 hours | 1 second | 15338754 | Yes | Yes | Numbered keys |
| 11512793 | 1 | Yes | 0.01% | 100 minutes | 1 second | 15338754 | No | No | Numbered keys |
| 11789795 | 1 | Yes | 0.01% | 24 hours | 1 second | 15338754 | Yes | Yes | Innovative design |
| 11775873 | 1 | Yes | 0.01% | 100 minutes | 1 second | 15348754 | No | Yes | Instant recall memory |
| 11799795 | 1 | Yes | 0.01% | 100 minutes | 1 second | 15348754 | No | Yes | Automatic memory |
| 11715873 | 1 | Yes | 0.01% | 20 hours | 1 second | 15348754 | No | No | Easy three key operation |
| 11745873 | 1 | Yes | 0.01% | 100 minutes | 1 second | 15338754 | No | Yes | Easy to use |
| 11765873 | 1 | Yes | 0.01% | 100 hours | 1 second | 15338754 | No | Yes | Clips to everything |
| 11729805 | 1 | Yes | 0.01% | 100 minutes | 1 second | 15338754 | No | Yes | Water resistant |
| Cat No. | Timing capacity | Traceable™ Certificate supplied |
Accuracy | Resolution | Timing functions | Features |
| 15233966 | 24 hours | Yes | 0.0035% | 1/100 second | A, B, C, D | Big digits |
| 11755833 | 24 hours | Yes | 0.0010% | 1/100 second | A, B, C, D | Water-resistant |
| 11765833 | 24 hours | Yes | 0.01% | 1/100 second | A, B, C, D | Disposable |
| 11522803 | 10 hours | Yes | 0.001% | 1/100 second | A, B, C, D | 60 memories |
| Cat No. | Traceable™ Certificate supplied |
Range | Resolution | Accuracy | Probe length |
Length cable |
Waterproof | Battery | Alarm | Display MIN/MAX |
| 11715853 | Yes | -50 to 70°C (-58 to 158°F) | 0.01° | ±3°C | 63mm | 3m | Probe/ cable | 15348754 | Yes | Yes |
| 11725853 | Yes | -50 to 70°C (-58 to 158°F) | 0.01° | ±0.3°C | 63mm | 3m | Probe/ cable | 15358754 | Yes | Yes |
| 11735853 | Yes | -50 to 70°C (-58 to 158°F) | ±0.01° | ±0.3° | 19mm | 3m | Probe/ cable | 15348754 | Yes | Yes |
| 11705853 | Yes | -50 to 70°C (-58 to 158°F) | 0.1° | ±0.5°C | 63mm | 3m | Probe/ cable | 15348754 | Yes | Yes |
| 11709755 | Yes | -50 to 70°C (-58 to 158°F) | 0.1°C | ±10.5°C | 19mm | 3m | Probe/ cable | 15348754 | Yes | Yes |
| 11715863 | Yes | -50 to 70°C (-58 to 158°F) | 0.1°C | ±0.5°C | 33mm | 3m | Probe/ cable | 15348754 | Yes | Yes |
| 11873460 | Yes | -50 to 70°C (-58 to 158°F) | 1° | ±1°C | 63mm | 3m | Probe/ cable | 15358754 | Yes | Yes |
| 11799735 | Yes | -50 to 70°C (-58 to 158°F) | 1° | ±1°C | 19mm | 3m | Probe/ cable | 15358754 | Yes | Yes |
| 11749745 | Yes | -50 to 70°C (-58 to 158°F) | 1° | ±1°C | 33mm | 3m | Probe/ cable | 15358754 | Yes | Yes |
| 15274016 | Yes | -30 to 70°C (-22 to 158°F) | 0.1° | ±1°C | 63mm | N/A | Probe/ cable | 15348754 | Yes | Yes |
| 15284016 | Yes | -30 to 70°C (-22 to 158°F) | 0.1° | ±1°C | 63mm | N/A | Probe/ cable | 15348754 | Yes | Yes |
| 11709745 | Yes | -30 to 70°C (-22 to 158°F) | 0.1° | ±1°C | 63mm | N/A | Yes | 15338754 | No | Yes |
| 11719745 | Yes | -30 to 70°C (-22 to 158°F) | 0.1° | ±1°C | 63mm | N/A | Yes | 15338754 | No | Yes |
| 11729745 | Yes | -30 to 70°C (-22 to 158°F) | 0.1° | ±1°C | 63mm | N/A | Yes | 15338754 | No | Yes |
| 11739745 | Yes | -30 to 70°C (-22 to 158°F) | 0.1° | ±1°C | 63mm | N/A | Yes | 15338754 | No | Yes |
| 1178543 | Yes | -50 to 70°C (-58 to 158°F) | 1° | ±1°C | 19mm | 3m | Probe/ cable | 15338754 | No | Yes |
| 11765853 | Yes | -50 to 70°C (-58 to 158°F) | 1° | ±1°C | 63mm | 3m | Probe/ cable | 15338754 | No | Yes |
| 12641395 | Yes | -50 to 70°C (-58 to 158°F) | 1° | ±1°C | 33mm | 3m | Probe/ cable | 15338754 | No | Yes |
| 11705863 | Yes | -50 to 70°C (-58 to 158°F) | 0.1° | ±1°C | 63mm | 3m | Probe/ cable | 15348754 | Yes | Yes |
| 13577070 | Yes | -50 to 70°C (-58 to 158°F) | 0.01° | ±0.1°C ± 2% | 63mm | 3m | Probe/ cable | 15348754 | Yes | Yes |
| 13567070 | Yes | -50 to 70°C (-58 to 158°F) | 0.01° | ±0.025%°C | 33mm | 3m | Probe/ cable | 15348754 | Yes | Yes |
| 13507080 | Yes | -100 to 70°C (-148 to 158°F) | 0.01° | ±0.25°C | 33mm | 3m | Probe/ cable | 15348754 | Yes | Yes |
| Cat No. | Traceable™ Certificate supplied |
Range | Resolution | Accuracy | Probe length |
Waterproof | Battery | Alarm | Display MIN/MAX |
| 15234016 | Yes | -200 to 500°C (-328 to 982°F) |
0.0001° | ±0.05°C | 160mm | No | 15318754 | No | Yes |
| 15244016 | Yes | -100 to 200°C (-148 to 392°F) |
0.0001° | ±0.05°C | 25mm | No | 15318754 | No | Yes |
| 11705843 | Yes | -50 to 150°C (-58 to 302°F) |
0.0001° | ±0.05°C | 229mm | Probe only | 15318754 | No | Yes |
| 13597070 | Yes | -100 to 199°C (-148 to 199°F) |
0.1° | ±0.01°C | 229mm | Probe only | 15348754 | No | Yes |
| 13577070 | Yes | -50 to 70°C (-58 to 158°F) |
0.01° | ±0.1°C | 63mm | Probe/cable | 15348754 | Yes | Yes |
| 13567070 | Yes | -50 to 70°C (-58 to 158°F) |
0.01° | ±0.25°C | 33mm | Probe/cable | 15348754 | Yes | Yes |
| 13507080 | Yes | -100 to 70°C (-148 to 158°F) |
0.01° | ±0.25°C | 33mm | Probe/cable | 15348754 | Yes | Yes |
| 11729765 | Yes | -50 to 400°C (-58 to 752°F) |
0.01° | ±0.1 ± 0.2°C | 160mm | Probe only | 15318754 | No | No |
| 11739765 | Yes | -99 to 200°C (-146 to 392°F) |
0.1° | ±2°C | 76mm | Probe only | 15318754 | No | No |
| 11799725 | Yes | -50 to 300°C (-58 to 572°F) |
0.1° | ±1°C | 190mm | Probe only | 15338754 | Yes | Yes |
| 11749725 | Yes | -50 to 150°C (-58 to 302°F) |
0.1° | ±1°C | 178mm | Probe only | 15338754 | No | No |
| 11789725 | Yes | -50 to 260°C (-58 to 500°F) |
0.1° | ±1°C | 197mm | Probe only | 15348754 | Yes | Yes |
| 11715843 | Yes | -50 to 300°C (-58 to 572°F) |
0.1° | ±1°C | 114mm | Yes | 15328754 | No | Yes |
| 11785853 | Yes | -50 to 300°C (-58 to 572°F) |
0.1° | ±1°C | 203mm | Yes | 15338754 | No | Yes |
| 11799715 | Yes | -50 to 300°C (-58 to 572°F) |
0.1° | ±0.4°C at tested points |
203mm | Yes | 15338754 | No | Yes |
| 11799705 | Yes | -50 to 150°C (-58 to 302°F) |
0.1° | ±1°C | 203mm | Probe only | 15338754 | No | No |
| 11719715 | Yes | -50 to 150°C (-58 to 302°F) |
0.1° | ±0.2°C | 203mm | Probe only | 15338754 | No | No |
| 11729715 | Yes | -50 to 300°C (-58 to 572°F) |
0.1° | ±1°C | 289mm | Probe only | 15338754 | No | No |
| 11739715 | Yes | -50 to 300°C (-58 to 572°F) |
0.1° | ±0.5°C | 289mm | Probe only | 15338754 | No | No |
| Cat No. | Traceable™ Certificate supplied |
Range | Resolution | Accuracy | Probe length |
Waterproof | Battery | Alarm | Display MIN/MAX |
| 15283996 | Yes | -50 to 150°C (-58 to 302°F) |
0.1° | ±1°C | 127mm | Entire unit | 15338754 | No | Yes |
| 15293996 | Yes | -50 to 150°C (-58 to 302°F) |
0.1° | ±1°C | N/A | N/A | 15348754 | No | Yes |
| 11775853 | Yes | Infrared sensor -55 to 250°C (-67 to 482°F) Piercing, stainless steel sensor -55 to 330°C (-67 to 626°F) |
0.20°C(0.0°F) between -10 and 200; otherwise 1°C 0.2°C (0.5°F) between -10 and 200; otherwise 1°C |
±0.6°C between -5 and 65°C ±0.5°C |
N/A 152mm |
N/A Probe only |
15318754 | No | Yes |
| 11779775 | Yes | -200 to 1,333°C (-328 to 2,431°F) |
0.1° | ±0.1°C | 1.2m | Cable only | 15358754 | Yes | Yes |
| 11709795 | Yes | -28 to 38°C (-20 to 100°F) |
N/A | ±1°C | N/A | N/A | 15358754 | No | No |
| 11719795 | Yes | -28 to 38°C (-20 to 100°F) |
N/A | ±1°C | N/A | N/A | 15358754 | No | No |
| 11759755 | Yes | -50 to 70°C (-58 to 158°F) |
0.2° | ±1°C | 3m | Probe/cable | 15348754 | No | Yes |
| 11749765 | Yes | -200 to 1,370°C (-328 to 2,498°F) |
0.1° and 1% | ±1°C | 6mm | Cable only | 15348754 | Yes | Yes |
| 11789765 | Yes | -200 to 1,300°C (-328 to 2,372°F) |
0.1° and 1% | ±0.3% ±1°C | 6mm | Cable only | 15348754 | No | Yes |
| 11729785 | Yes | -60 to 500°C (-76 to 932°F) |
0.1° | ±2°C or 2% | N/A | N/A | 15338754 | No | No |
| 11779785 | Yes | -50 to 1,000°C (-58 to 1,832°F) |
0.1° | ±1.5% ±2°C | N/A | N/A | 15348754 | No | No |
| 11709785 | Yes | -33 to 220°C (-27 to 428°F) |
0.1° | ±1°C ± 2% | N/A | N/A | 15348754 | No | No |
| Cat No. | Traceable™ Certificate supplied |
Range | Resolution | Accuracy | Probe length |
Length cable |
Waterproof | Battery | Alarm | Display MIN/MAX |
| 15294016 | Yes | -50 to 70°C (-58 to 158°F) | 0.01 | ±0.25°C | 63mm | 3m | Probe/ cable | 15348754 | Yes | Yes |
| 15204026 | Yes | -50 to 70°C (-58 to 158°F) | 0.01 | ±0.25°C | 63mm | 3m | Probe/ cable | 15348754 | Yes | Yes |
| 15214026 | Yes | -50 to 70°C (-58 to 158°F) | 0.01 | ±0.25°C | 19mm | 3m | Probe/ cable | 15348754 | Yes | Yes |
| 15224026 | Yes | -50 to 70°C (-58 to 158°F) | 0.01 | ±0.25°C | 19mm | 3m | Probe/ cable | 15348754 | Yes | Yes |
| 15234026 | Yes | -50 to 70°C (-58 to 158°F) | 0.01 | ±0.25°C | 63mm | 3m | Probe/ cable | 15348754 | Yes | Yes |
| 15244026 | Yes | -50 to 70°C (-58 to 158°F) | 0.01 | ±0.25°C | 159mm | 3m | Probe/ cable | 15348754 | Yes | Yes |
| 15388754 | Yes | -50 to 70°C (-58 to 158°F) | 0.01 | ±0.25°C | 159mm | 3m | Probe/ cable | 15348754 | Yes | Yes |
| 15264026 | Yes | -50 to 70°C (-58 to 158°F) | 0.01 | ±0.25°C | 63mm | 3m | Probe/ cable | 15348754 | Yes | Yes |
| 15274026 | Yes | -50 to 70°C (-58 to 158°F) | 0.01 | ±0.25°C | 63mm | 3m | Probe/ cable | 15348754 | Yes | Yes |
| 15284026 | Yes | -50 to 70°C (-58 to 158°F) | 0.01 | ±0.25°C | 19mm | 3m | Probe/ cable | 15348754 | Yes | Yes |
| 15294026 | Yes | -50 to 70°C (-58 to 158°F) | 0.01 | ±0.25°C | 19mm | 3m | Probe/ cable | 15348754 | Yes | Yes |
| 15204036 | Yes | -50 to 70°C (-58 to 158°F) | 0.01 | ±0.25°C | 63mm | 3m | Probe/ cable | 15348754 | Yes | Yes |
| 15214036 | Yes | -50 to 70°C (-58 to 158°F) | 0.01 | ±0.25°C | 159mm | 3m | Probe/ cable | 15348754 | Yes | Yes |
| 15224036 | Yes | -50 to 70°C (-58 to 158°F) | 0.01 | ±0.25°C | 159mm | 3m | Yes | 15348754 | Yes | Yes |
| 15398754 | Yes | -50 to 70°C (-58 to 158°F) | 0.1 | ±0.2°C between 0 and 10°C, ±1°C elsewhere | N/A | N/A | Yes | CR2016 3V lithium coin cell | Yes | Yes |
| 15318764 | Yes | -29 to 72°C (-20 to 162°F) | 0.1 | ±0.2°C between 0 and 30°C, ±5°C elsewhere | N/A | N/A | Yes | CR2450 3V lithium coin cell | Yes | Yes |
| 15238764 | Yes | -200 to 72°C (-328 to 162°F) | 0.1 | ±2°C between 0 and 30°C, ±2°C elsewhere | N/A | N/A | Yes | CR2473 3V lithium coin | Yes | Yes |
| 13557070 | Yes | -30 to 70°C (-22 to 158°F) | 0.1 | ±0.6°C | 63mm | 2m | Probe/ cable | 15358754 | Yes | Yes |
| 13587070 | Yes | -30 to 70°C (-22 to 158°F) | 0.1 | ±0.6°C | 63mm | 2m | Probe/ cable | 15348754 | Yes | Yes |
| Cat No. | Traceable™ Certificate supplied |
Relative humidity range | Resolution | Accuracy | Temperature range |
Resolution | Accuracy | Battery | Features |
| 15214016 | Yes | 0 to 90% RH | 0.1% RH | ±0.5% RH | 0 to 50°C | 0.1°C | ±1°C | 15318754 | Data-logger with memory card |
| 11765843 | Yes | 25% to 90% RH | 1% RH | ±2% RH | 0 to 50°C | 1°C | ±1°C | 15348754 | Dual min/max memories |
| 11724196 | Yes | 1 to 99% RH | 0.1% RH | ±4% RH | -40 to 70°C | 0.1°C | ±1°C | 15348754 | Dew point and we-bulb monitor |
| 11725843 | Yes | 20 to 90% RH | 1% RH | 5% RH | 0 to 50°C | 0.1°C | ±1°C | 15348754 | View time, temp and humidity |
| 15264006 | Yes | 1 to 99% RH | 1% RH | ±3% RH | -10 to 60°C | 1°C | ±1°C | 15348754 | RH alarm and reads dew points |
| 15214016 | Yes | 0 to 90% RH | 0.1% RH | ±0.5% RH | 0 to 50°C | 0.1°C | ±1°C | 15318754 | Data-logger with memory card |
| 11755843 | Yes | 5 to 95% RH | 0.01% RH | ±1.5% RH | -40 to 104°C | 0.01°C | ±0.4°C | 15318754 | Response time of 10 seconds |
| 11745843 | Yes | 10 to 95% RH | 0.01% RH | ±1.5% RH | -40 to 104°C | 0.01°C | ±0.4°C | 15318754 | Also reads dew points |
| 11597443 | Yes | 10 to 95% RH | 0.1% RH | ±2% RH | -18 to 93°C | 0.1°C | ±1°C | 15318754 | Computer output |
| 11536973 | Yes | 10 to 95% RH | 0.1% RH | ±2% RH | -50 to 70°C | 1°C | ±1°C | 15348754 | Jumbo digits |
| 11714196 | Yes | 20 to 99% RH | 1% RH | ±5% RH | -50 to 70°C | 0.1°C | ±1°C | 15348754 | Remote humidity sensor |
| 11739835 | Yes | 10 to 95% RH | 0.1% RH | ±3% RH midrange, ±5% RH elsewhere | -20 to 60°C for T1 -200 to 1,333°C for T2 | ±1°C for T1 0.1°C for T2 from -200 to 999.9°C elsewhere 1°C | ±1°C for T1 ±2% of reading plus 1.8°C for T2 | 15348754 | Print out readings |
| 11782146 | Yes | 0 to 100% RH | 10% RH | ±5% RH | N/A | N/A | N/A | N/A | Humidity card |
| Solvent grade and product code | ||||||||
| Cat. No | Quantity | Packaging | HPLC grade | HPLC gradient grade |
Advanced HPLC grade |
UHPLC gradient grade |
LC/MS | Optima LC/MS |
| Acetonitrile GHS: Flam, Liq.2, Acute Tox.4, Eye Irrit.2 |
500mL 1L 1L 2.5L 2.5L 4L 5L |
Glass bottle Glass bottle Plastic coated glass bottle Glass bottle Plastic coated glass bottle Glass bottle Glass bottle |
- 10754361 - 10407440 10010010 - 10181460 |
- 10794741 - 10660131 10660131 - 10500911 |
- - 10398233 - 10629112 - - |
- - 11317080 - 11373230 - - |
- 10799701 - 10616653 - - - |
10055454 10489553 - 10001334 - - - |
| Methanol GHS:Flam. Liq.2, Acute Tox.3, STOT SE 1 |
500mL 1L 1L 2.5L 2.5L 4L 5L |
Glass bottle Glass bottle Plastic coated glass bottle Glass bottle Plastic coated glass bottle Glass bottle Glass bottle |
- 10012080 - 10499560 10000280 - 10487322 |
- 1037171 - 10449380 10257243 - - |
- - 10144953 - 10670263 - - |
- - 11307090 - 11357090 - - |
- 10434902 - 10777404 - - - |
10636545 10031094 - 10767665 - - - |
| Water | 500mL 1L 1 2.5L 2.5L 4L 5L |
Glass bottle Glass bottle Plastic coated glass bottle Glass bottle Plastic coated glass bottle Glass bottle Glass bottle |
- 10367171 - 10449380 10257243 - - |
- 10367171 - 10449380 10257243 - - |
- - 10327873 - 10221712 - - |
- - 11307090 - 11357090 - - |
- 10434902 - 10777404 - - - |
10095164* 10728098* - 10505904* - - - |
| Filtered to: | 0.2μm | 0.2μm | 0.2μm | 0.1μm | 0.2μm | 0.1μm * 0.03μm |
||
| Fisher Bioreagents Water portfolio |
Purity specification | Nuclease and protease | General applications | |||||||||||
| Cat. No | Description | Quantity/ packaging |
DEPC treated |
Sterile (autoclave) |
0.2μm filtered |
0.1μm filtered |
Dionised for low metal ion content |
DNase not detected |
RNase not detected |
protease not detected |
DNA work |
RNA work |
Protein work |
Routine life science research* |
| 10091543 10448153 |
Water Biotech grade | 4L PolyPac 20L PolyPac |
• | • | ||||||||||
| 10192813 | Water, sterile DNA grade | 1L Poly bottle | • | • | • | • | • | • | ||||||
| 10245203 | Water, sterile For RNA work, DEPC-treated and nuclease free | 1L Poly bottle | • | • | • | • | • | • | • | |||||
| 10295243 10336503 |
Water, sterile DEPC-treated and nuclease free |
50mL Poly bottle 100mL Poly bottle |
• | • | • | • | • | • | • | |||||
| 10490025 10505854 10154604 10318354 10517554 |
Water Molecular Biology grade | 100mL Poly bottle 1L Poly bottle 4L PolyPac 10L PolyPac 20L PolyPac |
• | • | • | • | • | • | • | • | ||||
| *buffers, wash and rinse solutions, etc. | ||||||||||||||
This chart may be helpful to identify the suitable vials and closures for your specific instrument

Chemical compatibilities of vial and closure materials
Depend on Fisherbrand, Fisher Chemical and Fisher Bioreagents to provide products for every step of your Chromatography workflow

Depend on Fisherbrand, Fisher Chemical and Fisher Bioreagents to provide products for every step of your Genomic workflow.

Depend on Fisherbrand, Fisher Chemical and Fisher Bioreagents to provide products for every step of your Proteomic workflow.

Depend on Fisherbrand, Fisher Chemical and Fisher Bioreagents to provide products for every step of your Water Analysis workflow